How to create multiple profiles for Windows Terminal


Prerequesites:
You need to have the Windows Terminal installed
You also need to install the different environments you would like to add a profile for, like Git Bash, Ubuntu/Linus for windows or Azure Cloud Shell
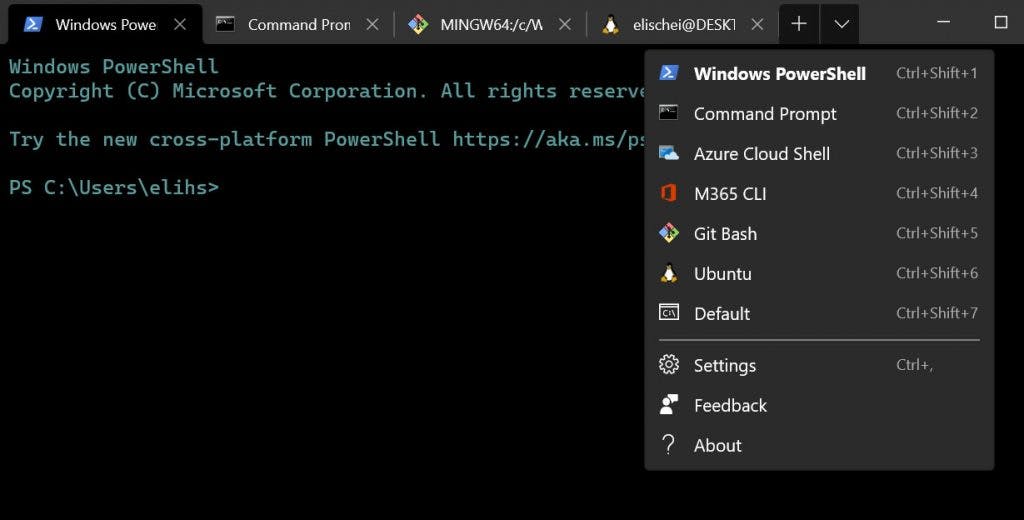
If you are using windows terminal you know that you can use multiple tabs. But did you know that you can create multiple profiles to choose from when opening a new tab? In this blogpost I will show you how to create multiple profiles for Windows Terminal, and how to create and add different color shemes to them.
Create the profiles
To create the profiles is quite straightforward. Just go to settings by selecting the down-arrow next to your tabs and choosing “Settings” (or use the shortcut [Ctrl + ,]. This will open the settings.json file in your prefered editor.
Find the “Profiles” part of the json and add the profiles you would like. In the code-snippet below you can se the profiles I have added. Lets take a look at the different attributes in a profile.
guid: has to be unique between profiles
name: The name that shows up in the dropdown list when you are opening a new tab.
commandline: this command will run when you open a tab in this profile.
hidde: if this is true the profile will not show up in the dropdown.
colorScheme: name of color scheme you would like to use.
icon: filepath or url to icon you would like to use
"profiles": { "defaults": { // Put settings here that you want to apply to all profiles. }, "list": [ { // Make changes here to the powershell.exe profile. "guid": "{61c54bbd-c2c6-5271-96e7-009a87ff44bf}", "name": "Windows PowerShell", "commandline": "powershell.exe", "hidden": false, "colorScheme" : "Elis-ps" }, { // Make changes here to the cmd.exe profile. "guid": "{0caa0dad-35be-5f56-a8ff-afceeeaa6101}", "name": "Command Prompt", "commandline": "cmd.exe", "hidden": false, "colorScheme" : "Elis-cmd" }, { //Azure Cloud Shell "guid": "{b453ae62-4e3d-5e58-b989-0a998ec441b8}", "hidden": false, "name": "Azure Cloud Shell", "source": "Windows.Terminal.Azure" }, { "guid": "{b453ae62-4e3d-5e58-b989-0a998ec441b9}", "hidden": false, "name": "M365 CLI", "commandline": "cmd.exe m365", "icon": "blobs.officehome.msocdn.com/images/content/..", "colorScheme" : "Elis-cmd" }, { "guid" : "{b453ae62-4e3d-5e58-b989-0a998ec441a6}", "hidden": false, "name" : "Git Bash", "commandline" : "\"%PROGRAMFILES%\\git\\bin\\bash.exe\"", "icon" : "%PROGRAMFILES%\\git\\mingw64\\share\\git\\git-for-windows.ico", "colorScheme" : "GitBash" }, { "guid": "{2c4de342-38b7-51cf-b940-2309a097f518}", "hidden": false, "name": "Ubuntu", "source": "Windows.Terminal.Wsl", "commandline": "wsl ~" } ] }
Create different color shemes for different profiles
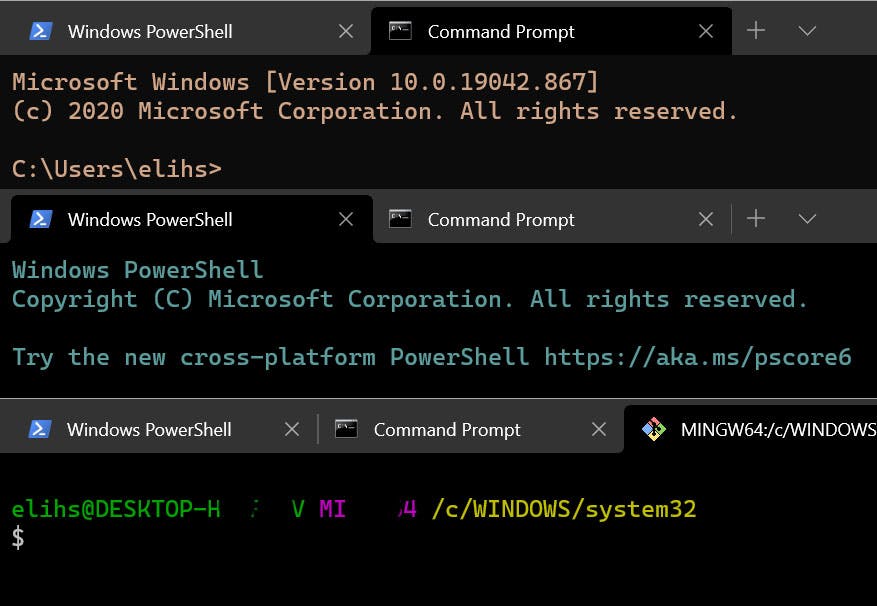
You can also create different color shemes. I have created one for the command promt, one for powershell, and one for git-bash – since those are the profiles I use the most. I think the different color shemes makes it easier to remember which context I’m in at a glance.
In the codesnippet below you can see the different color schemes I use. To add them to one of your profile just give them a name and add a “”colorScheme” : “color-scheme-name” attribute pair to the profile.
"schemes": [ { "name" : "Elis-cmd", "background" : "#0C0C0C", "foreground" : "#d1a587", "black" : "#0C0C0C", "blue" : "#5b72b6", "cyan" : "#6789a3", "green" : "#608a5e", "purple" : "#6f4075", "red" : "#b1548a", "white" : "#ebc0e5", "yellow" : "#C19C00", "brightBlack" : "#e3e4e6", "brightBlue" : "#7a9adf", "brightCyan" : "#a5cacc", "brightGreen" : "#95d8c2", "brightPurple" : "#6c337e", "brightRed" : "#97248a", "brightWhite" : "#F2F2F2", "brightYellow" : "#F9F1A5" }, { "name" : "Elis-ps", "background" : "#000000", "foreground" : "#5b9c9c", "black" : "#0C0C0C", "blue" : "#5b72b6", "cyan" : "#6789a3", "green" : "#608a5e", "purple" : "#6f4075", "red" : "#b15454", "white" : "#ebc0e5", "yellow" : "#C19C00", "brightBlack" : "#e3e4e6", "brightBlue" : "#7a9adf", "brightCyan" : "#a5cacc", "brightGreen" : "#95d8c2", "brightPurple" : "#6c337e", "brightRed" : "#ca7f4c", "brightWhite" : "#F2F2F2", "brightYellow" : "#e9d76f" }, { "name": "GitBash", "background" : "#000000", "black" : "#0C0C0C", "blue" : "#6060ff", "brightBlack" : "#767676", "brightBlue" : "#3B78FF", "brightCyan" : "#61D6D6", "brightGreen" : "#16C60C", "brightPurple" : "#B4009E", "brightRed" : "#E74856", "brightWhite" : "#F2F2F2", "brightYellow" : "#F9F1A5", "cyan" : "#3A96DD", "foreground" : "#bfbfbf", "green" : "#00a400", "purple" : "#bf00bf", "red" : "#bf0000", "white" : "#ffffff", "yellow" : "#bfbf00", "grey" : "#bfbfbf" } ],
Did you find this article usefull? Follow me on twitter to be notified when I publish something new!
Also, if you have any feedback or questions, please let me know in the comments below. 
Thank you for reading, and happy coding!
/Eli
The post How to create multiple profiles for Windows Terminal first appeared on A cup of dev.